Virtual Environments has been the module that I have spent the most time on since my time at Uni by far. The amount of hours I have put it has been off the scale, a lot of that time has been spent problem solving things that wont work but mistakes have to be made when learning.
Its particularly rewarding producing 3D work, the results are normally impressive more so than other work in other media. Learning solid surface modelling techniques has been very enjoyable, its been something i have wanted to experiment with since I started producing 3D models. The chamfer tool is my new best friend. Other new skills include the mental ray render engine. It arch & design base templates are very powerful materials and can totally transform a model, mental ray also renders scenes with complex lighting quicker, cant see myself going back to scanline now.
Another new skill I have learnt is the use of the rayfire tool. This tool creates spectacular results but is by far the most unstable software I have ever used. You have to have the patience of a saint to use it, if you think its not doing anything, well it probably is, just leave it. Thats my best tip for the software. If I knew the problems it would cause us at the beginning of the module I would still go ahead with it. The results are spectacular and its definitely something I can use in future work. I always look to push myself and always try new things, sometimes this is more successful than other times but I am very happy with the way the work came out.
I think our final animation was very strong if a little rough around the edges. With pushing the boundaries comes risk and in using rayfire we were pushing our skills but we wanted to produce an animation that was truly unique and in the end our animation was totally original which is something we are proud of.
Because of the apparent complexity of having all our models on one globe we could not render the image because of ram issues apparently which stopped us producing a long shot of the globe which lost a lot of the surreal effect we were trying to achieve. I will now look at tidying up the animation for personal reward and separate my own parts of the animation to include in my portfolio of work.
Thursday, 9 December 2010
Rendering and Premiere Pro
Camera pans were applied to animations and then we rendered out the finished rayfire animations out in 720px hd format. This was done at a much later stage than we had planned for due to earlier problems, however we did manage to render the majority of what we wanted to get rendered. Sadly a few compromises has to be made at the rendering stage meaning we had less camera angles for the final composition.
We post produced the animation in premiere pro. I applied a reverse speed to the rayfire clips to make the buildings seem to be constructing. Had we had a little more time I would like to have used the Time Remapping feature in premiere to control the speed of the clips however we were unable to do this due to time constraints. Sound effects and a soundtrack was applied. The music was royalty free under the creative commons license and would be allowed to appear on a profit organisations website. We could have picked a song that would have sounded better however the client was a real client and we did not want to use copyrighted music. However after watching other presentations no other groups seemed to take this into consideration.

We post produced the animation in premiere pro. I applied a reverse speed to the rayfire clips to make the buildings seem to be constructing. Had we had a little more time I would like to have used the Time Remapping feature in premiere to control the speed of the clips however we were unable to do this due to time constraints. Sound effects and a soundtrack was applied. The music was royalty free under the creative commons license and would be allowed to appear on a profit organisations website. We could have picked a song that would have sounded better however the client was a real client and we did not want to use copyrighted music. However after watching other presentations no other groups seemed to take this into consideration.

Lighting
A lot of time was spent finding ideal lighting with the group experimenting with different styles. In the end we settled on a natural looking 5 light setup - 1 skylight and 4 omni lighting objects separately with them all excluding different objects.
We did initially decided to go with the surreal lighting created by Arnas however this caused max to crash on any other machine than his, after not finding a solution to the problem we resorted back to the earlier lighting setup already mentioned.


We did initially decided to go with the surreal lighting created by Arnas however this caused max to crash on any other machine than his, after not finding a solution to the problem we resorted back to the earlier lighting setup already mentioned.


Rayfire Problems
Once all the models were at a final stage the rayfire animation was ready to be put into its final stage. However this was highly problematic. For still unknown reason this did not want to work, buildings were not fragmenting properly and they weren't fragmenting. Eventually after 3/4 days of playing with settings after constant crashed I managed to overcome the issues, largely due to the complex materials on all the model and the computer running out of ram on my 32bit version of max. This has left a mad rush to get all the models finished rendered in time. We did not plan for this delay that rayfire has caused.
Rayfire - great end results: not good for complex models unless you like enjoy the 3ds max loading graphic. :(
Saturday, 27 November 2010
How I Created the Model Destruction
The 3DS Max 'Rayfire' plugin allows for complex model destructions that was perfect for what we wanted to achieve with our animation. Once the model was finished with materials / textures added it was time to apply the plugin to the model. The following steps are how the animation is created:
1. Attach all individual objects into 1 object. This is mainly because if the rayfire tool is applied to multiple objects Max tends to crash. For the church I left the windows seperate.
2. Create a sphere that will act as the 'wrecking ball' that will destruct the scene (this is hidden/deleted after the animation is created)
3. Animate the sphere passing through the object to be destroyed.
4. Open Rayfire and select the church and add it as a 'Impact Object' under the 'Simulation' Tab.
5.In the RayXplosion tab select the Fragmentation Type and the iterations, which is the number of segments that the model will be fragmented in. More fragments = better end result however is difficult for the PC/Max to process, too many normally ends in a Max crash. Once selected click 'Fragment Impact Objects'. The Software then automatically fragments the model.
6. Under the Physics tab Set the 'wrecking ball' as an unyielding object. Do the same for the base that the model sits on.
7. Select all fragments and set them as Inactive Objects.
8. Under physical options set the start frame and the time range in frames.
9. Click Create Animation and (if it doesn't crash....which it often will) wait for Rayfire to generate the keyframes.


Friday, 26 November 2010
Progress 3
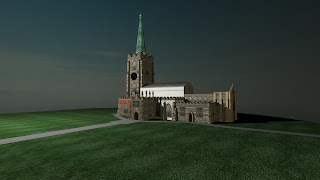
The materials have now been finished and the church now sits on a globe to provide a soft render environment. The materials are a collection of largely stock images collected from the internet and edited in photoshop. Sections such as the orange brick wall were merged with the stone wall parts to accurately represent the actual church. I am extremely happy with the way the model has come out. The model is extremely accurate and detailed the ornaments are very nicely modelled and the detail level on the slate roof parts I am particularly pleased with.


Tuesday, 23 November 2010
Progress 2
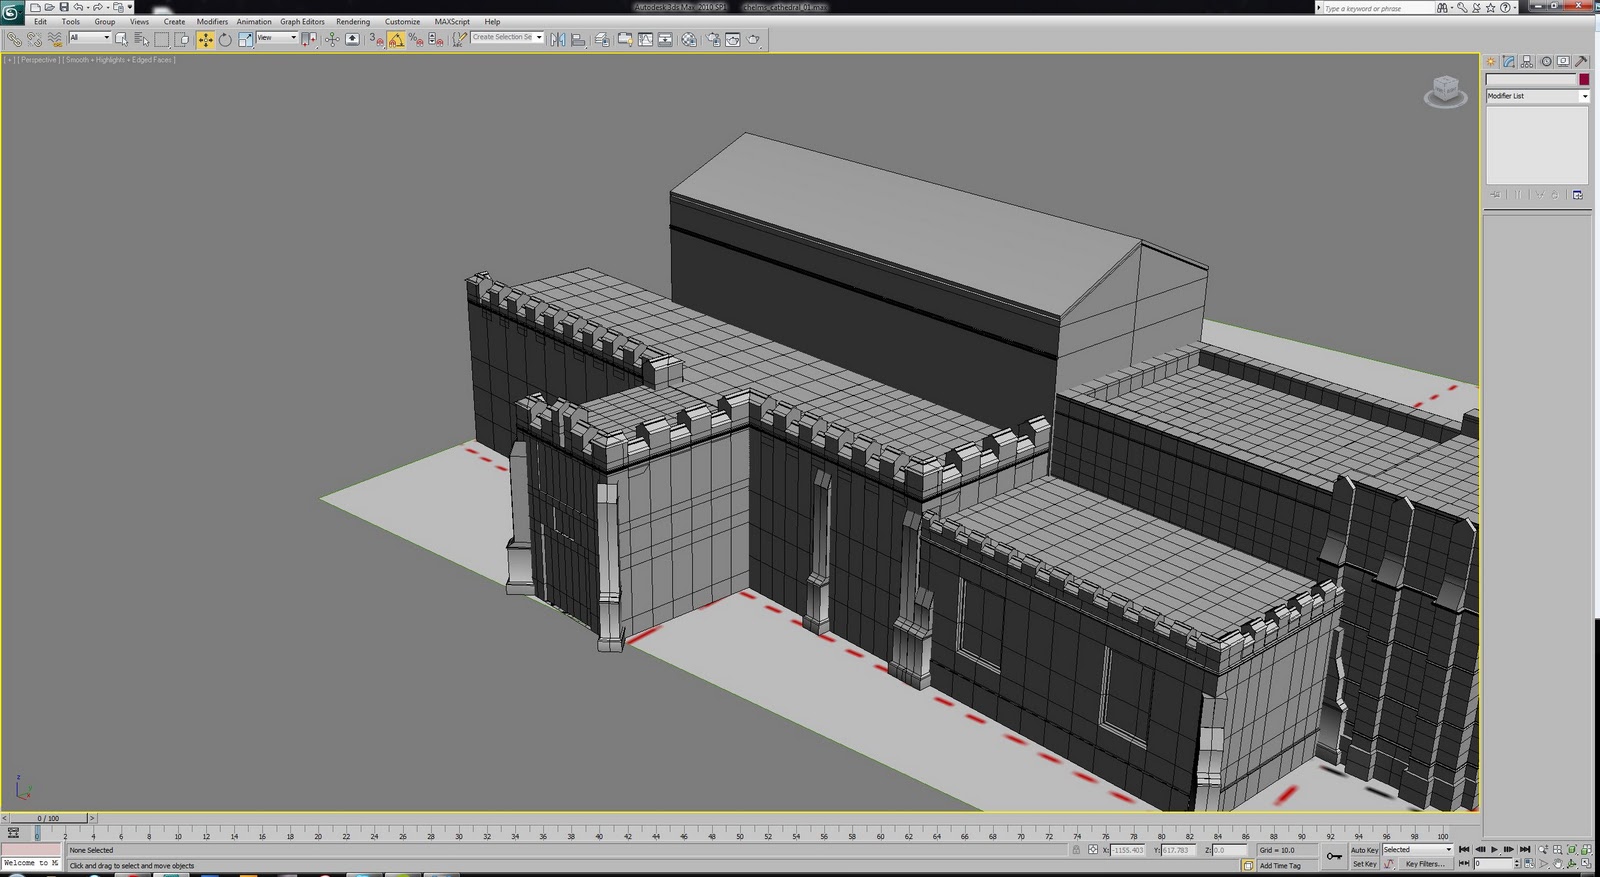
The model is now largely finished structurally. All sections have been modelled which just leaves the materials now. I have collected a massive resource of source materials in attempting to find the perfect one for my church, if I cannot find that perfect one I will take an SLR camera to the church and obtain some of my own images to use. Il continue looking online for the moment as im sure to get strange looks photographing a church at midnight.


Monday, 15 November 2010
Chelmsford Cathedral, so far.....
After creating my guides I then Started the modelling of the church. Im initially creating all the main structures and creating bits of detail where I fancy along the way. The windows and doors are going to be very difficult so im going to leave them until the end for fear of spending too much time on them.
So far I've been modelling from boxes mainly, using the chamfer tool a lot to smooth corners and to create the ridges in the building. Could do with learning some architectural terms for writing in the blog thinking about it. I will be going into much more detail later on to explain how I did the more challenging parts of the model.


Saturday, 13 November 2010
My model choice....
I have decided to model Chelmsford Cathedral. Its a spectacular historical building that would be a great challenge to model in 3d and also a very interesting to apply the rayfire plugin to.


Friday, 12 November 2010
Learning Solid Surface modelling techniques - Fountain Tutorial
So far during university I have primarily been making organic models. Which leaves me lacking the skills in solid surface modelling. I have spent a lot of time watching tutorial videos on youtube on how to model buildings and other relevant structures.
I followed this fountain tutorial to produce the model below. The website the tutorial is located is a really good resource for very high quality tutorials.

Wednesday, 27 October 2010
Subscribe to:
Comments (Atom)